- [email protected]
- (669) 696-3655

The amount of samples and sample instructions will depend on the information you want to know and on the variability of the field.
For example, if you want to evaluate soils in your orchard, lawn, and a vegetable garden, it would be 3 different samples taken separately. In addition, divide samples from healthy and unhealthy plants. For instance, If you have a few unhealthy trees, take one sample from the healthy trees and another one from the sick trees, overall 2 samples from your orchard. Also, sample weedy patches in your lawn (or pasture) separately from non weedy areas. You can also get more useful results if you take separate samples from different kinds of plants. For example, you can sample around your tomato plants and around your kale plants and submit 2 different samples from your garden. All together you would submit 6 samples (or more if you want to assess more than 1 sample per area).
In the previous example plant communities were used to define sampling areas. You can also use climate or seasonality, soil type, management practices, water dynamics (wetland, riparian, arid, semi-arid), and so on to define an area. Just make sure that all samples come from the root systems of plants that are representative of the area you are sampling (except for bare soil).
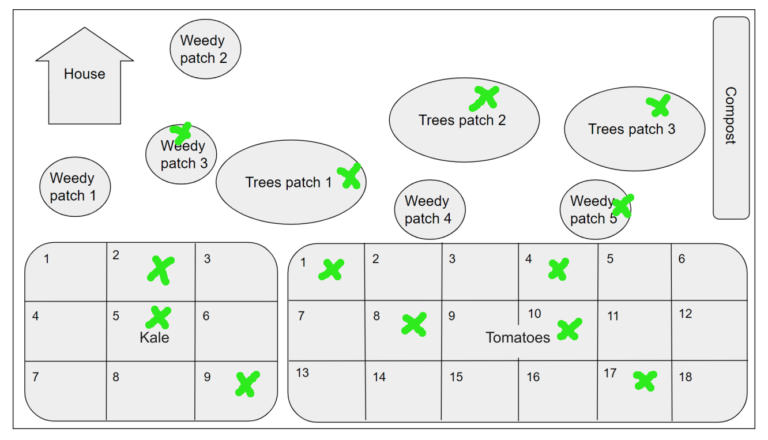
For a more scientific approach you may draw a map of your property, categorize the areas, overlay a numbered grid on each large area you want to sample, and mark the sampling areas for your records. Then use the instructions below to take samples, but avoid taking samples from the parts of the grid that are not representative.
Now that you have chosen what you want to sample it is time to have some fun!
But first please note the following:
Please do not send much more than 3-4 oz per sample. Rapid delivery is way more important than the volume of the samples.
Remove any top debris and insert an apple corer to a depth of 3 inches or as deep as you can go*. Twist and pull out a soil core. Place it into a resealable plastic bag or bucket depending on your scenario.
*If you can’t penetrate the soil to a depth of 3 inches, and, say, only can go 2 inches deep, take all of the cores in this sample at 2 inches. You may need to take additional cores to get the 3 oz / 100 g sample volume in this case.
A 3-inch core sample should be taken from within the first 3-4 inches of soil because the soil food web in that top 0-3 inches is pretty representative of the whole root system that goes deeper. If soil is compacted, roots go sideways instead of down. Compaction from the rain drops hitting the soil typically starts at 4-6 inches, and there can be other compaction layers caused by animals or heavy equipment. In this case, taking a sample deeper than 3-4 inches will only show the biology of some of the compaction layers (most likely an outrageous amount of anaerobic bacteria along with anaerobic protozoa) instead of the biology in the rhizosphere.
Collect 3 core samples around the plant halfway between the stem and the dripline (the outer edge of the canopy of your plant). Place each core sample in a resealable bag and leave the cores un-mixed as they should be mixed just before the assessment.
Please ensure that you do not fill the bag more than half-way with the material. Seal the bag with the air left inside – do not expel the air from the bag, as this may result in anaerobic conditions being formed. Label the bag with the sample name (e.g. “Pepper plant”) and date on the outside* using a permanent marker or an affixed label. Write this information on the Order Form as well.
Take 3 core samples from 3-5 different plants of the same kind at the same area**. You may 1) place each sample in a resealable bag and submit separately or 2) subsequently combine and gently mix all samples in a clean bucket and place about 3 oz (100g) of the mix in a resealable bag without further mixing and disturbing.
Please ensure that you do not fill the bag more than half-way with the material. Seal the bag with the air left inside – do not expel the air from the bag, as this may result in anaerobic conditions being formed. Label the bag with the sample name (e.g.”Sick apple trees”) and date on the outside* using a permanent marker or an affixed label. Write this information on the Order Form as well.
** You may select 3 to 5 grids using a random number generator (see the picture above), go to the center of the first grid and sample from the closest plant (choose another plant if the closest one is not representative of the area), then repeat the process for each selected location.
Please note – The next time a sample is taken from this area, walk to the middle of each grid and choose A DIFFERENT close plant because taking 3 cores from around a plant causes significant disturbance.
(e.g. in a field that was recently tilled and not yet planted)
Draw a map of the area you want to sample. Select randomly 5-6 areas per acre ensuring that they are well distributed over the area of the field. Avoid areas near boundaries and any areas that are not representative of the field e.g. a ridge line or depression. Mark these areas on the map so that you can repeat assessments in the same locations in the future. Take 3-4 core samples from each of these 5-6 areas per acre. You may 1) place cores from each area in an individual bag and submit them separately (5-6 bags per acre) or 2) subsequently combine and gently mix all samples in a clean bucket and place about 3 oz (100g) of the mix in a resealable bag without further mixing and disturbing.
Please ensure that you do not fill the bag more than half-way with the material. Seal the bag with the air left inside – do not expel the air from the bag, as this may result in anaerobic conditions being formed. Label the bag with the sample name (e.g. “Lawn: weedy patches”) and date on the outside* using a permanent marker or an affixed label. Write this information on the Order Form as well.
Take small samples from a minimum of
Make sure to take the samples from various locations and depths. Subsequently combine and gently mix all samples in a clean bucket. Place about 3 oz (100g) of the mix in a resealable bag without further mixing and disturbing..
Please ensure that you do not fill the bag more than half-way with the material. Seal the bag with the air left inside – do not expel the air from the bag, as this may result in anaerobic conditions being formed. Label the bag with the sample name (e.g. “Finished compost”) and date on the outside* using a permanent marker or an affixed label. Write this information on the Order Form as well.
Please note: Liquid samples require overnight shipping. Ideally a liquid sample should be assessed immediately or within 4-6 hours to prevent it from going anaerobic. However, the movement during shipment will keep the sample aerated if you fill the container no more than 1/3 full.
Use a clean, dry cup to take several samples from your brewer or extractor. Avoid immersing your hand or arm into the liquid to prevent contamination. For extracts or teas, take the samples from the top 1-2” (2.5-5 cm) while being aerated. Take about 10 mL each time, placing the liquid in a clean container. Wait 10-15 seconds and take more liquid, putting it in the same container as the first sub-sample. Repeat 3 times. Pour liquid into a clean, non-breakable 4 to 8 oz watertight container (e.g. plastic water bottle with screw cap).
Please fill the container no more than 1⁄3 full to maximize head space for air exchange. Once the screw cap is tightly sealed, cover it with duct tape and place it in a sealed plastic bag. Label the bag/bottle with the sample name (e.g. “Compost tea”) and date on the outside* using a permanent marker or an affixed label. Write this information on the Order Form as well.